How I fixed My Loose
hinges:
Delltm Inspiron 300m

(Based on true events)
Someone made this tutorial with
better pictures, you can find it HERE
March 5th 2008:
IMPORTANT UPDATE! The fix in this tutorial appears to be TEMPORARY. The hinges continue
to wear down over time and get loose again. Makes sense considering the hinges in a
brand new state got loose to begin with which has brought you here in the first place.
What I have done is found after years of looking is a VERY ugly solution to the problem of
the laptop becoming unusable becasue it wont stay open. I love this laptop and would perfer nothing
more than for it to be pristine again, but the need for using it has now overshadowed any aesthetic
desires.
***Pictures will follow when i get a chance
If you are willing to permantly sacrifice aesthetics and some portabilty such as transporting in a close position
heres what I did. This may work with the regular battery but I have the extended life battery and
the design of that appears to help, but I think it can work with either.
There is a glue you can get at home depot called Gorilla Glue. This is hardcore stuff used in carpentry,
not that regular shit you can rub on your dick and get off with. Anyway, this glue dries kinda soft. Almost like
calk, that plumbing stuff they use in the porn movies. So I removed the laptop hinges that are the culprits in this
mess to begin with, and i propped the LCD back in place and put the hinge covers back on which help keep it inplace.
I then pour the Gorilla Glue into valley where the LCD rests into the laptop crevace. I basically drowned the area in glue
hoping that it would harden and attache itself to both the bottom of the LCD and the battery. As it hardens it expands
and starts to create like pillow of support to hold the LCD open. First I applied to the front without realziing I should
Create a similar pillow of glue in the back on the extended portion of the battery. It was holding up OK on teh front only
which is why I dont think you need the extended battery but it certainly appears to help. Be very careful becasue this
glue is no fun to get everywhere like i did. Wipe off excess glue before it gets into important nooks and crannies your unit.
The glue dries brownish color so it looks like SHIT, worse than this website. BUT, the screen is open and I can sit
on the couch or in my backyard and work on it. Give it a shot. Like always you can email me any questions. If i here
enough interest I'll supply screenshots. Done properly the unit wont look so bad with this method but I didnt do it properly
so it looks like ass.
If you are here, chances are your
$1200 laptop has been made useless by $2 pieces of metal
that DELL refuses to sell to you and
other places either don’t have them in stock or want
$100+ for them.
After nearly giving up, I decided to take matters into my own hands and
see if there was an alternative to
being ripped off and luckily there was. In the process
I have banned DELL from ever
selling anything to me again, unless I get a written
apology from Michael Dell himself, who
should be in jail. Or get a ton of free shit from
someone at DELL who cares about customer
support to reimburse me for the countless
hours I spent talking to Indians and
Argentines on the phone, only to never get any help
on anything I’ve ever called about.
Anyway, I digress.
Disclaimer: This is what
worked for me. It may not work for you and if
break your laptop its your fault not mine. If you don’t know what
you are doing then don’t do it. This could possibly void any
warranties
you have on your unit. I do not know if the same hinge technology
is used
in other models so I do not know if they are fixable in this way.
you can email me if your model was fixed this way, my email is at
the
bottom of the page.
The bad news: I had to take the entire LCD assembly apart.
I
stripped every screw along the way. Scratched the screen.
Scratched the bezel. Stripped some wires bare.
And made my
laptop look like an Iraqi mule stepped on it in a war zone
as
it was running for cover.
The good news: You won’t have to do any of
this. All you
need to do is remove 4 screws and the hinge covers to get
to
what you’ll need to work with which is this:

This
is one half of the hinge mechanism and most likely the culprit
for
your looseness (As for your wife’s or girlfriend’s looseness
see
the black guy next door).
The
other half is just the shaft that the rod circled in yellow
goes into. The shaft and rod create friction, if you know what
I
mean, and this is what keeps the screen up. That shaft is
attached to the inside of the LCD bezel and you do not need to
remove it (I did like an asshole).
Anyway,
see how the rod extends from where it is circled in
yellow to where its circled in red?
It’s one piece. The red
part was sticking out even more than this when I first removed it
but
I didn’t think to take pictures until this point so yours might
vary as to how far out it sticks out(if your’e
asian for example).
It’s
not suppose to stick it at all or not much anyway so all you have to do is
hammer it down back towards the yellow part so its not sticking out on the red
side.
I had
to use pliers to grip it. Firm but gentle hammer hits. You don’t want
to
hit it too hard so you don’t expand the mechanism and lose its grip
inside. I didn’t hammer it down all the way. I went just a little bit
farther down than you see in the picture and its holding up just fine
and
feels pretty sturdy. Obviously you will be doing this to both
hinges so just follow the same rules for both.
To
get to the hinges you only need to remove the blue hinge covers
which you can do by opening the screen all the way flat. Removing
the
black screws below that are in the corners below the LCD on
the laptop underside. And then carefully removing this screw, circled
in
red,
so you don’t strip it:
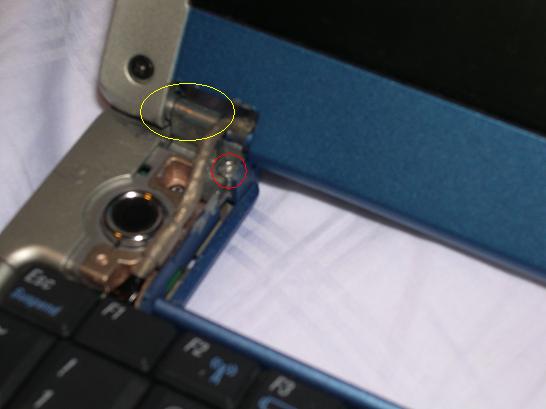
The
yellow
part is the hinge we talked about above before I removed it
And
you see it on the palm of my hand in the picture before this one.
After
hammering those parts in, you just replace it into the shaft.
You
should notice that it is now creating friction again. Replace
screws and the hinge covers and you should be good to go:


Any
questions you may have or if you would like to supply better
pictures for this site, or if you just want to let me know that it
worked for your laptop model too, email me at:
Fuck you DELLTM assholes.